In
Power Apps non esiste nativamente un controllo
calendario, ma può comunque essere realizzato tramite un
componente.
Calendariovediamo come.
Component
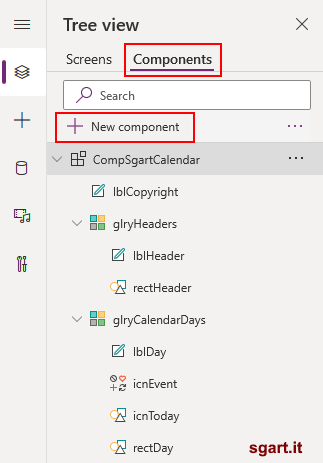
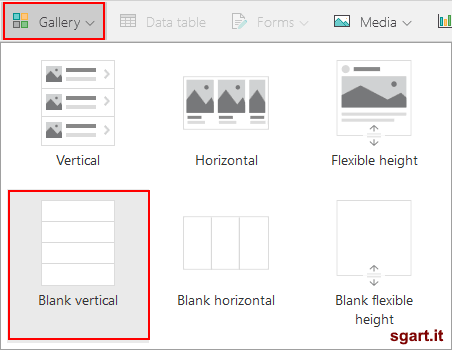
Per prima cosa creiamo un nuovo
componente
New componentVanno aggiunte due
gallery blank vertical, una per l'header delle colonne e uno per i giorni del mese:
Gallery blank verticalIl nuovo
componente avrà questa struttura:
- CompSgartCalendar
- lblCopyright
- glryHeader
- lblHeader
- rectHeader
- glryDays
- lblDay
- icnEvent
- icnToday
- rectDay
Ogni componente dovrà avere le proprietà impostate in modo appropriato, vedi dopo.
Custom properties
Perchè funzioni, vanno aggiunte delle
custom properties al componente:
Custom properties
#class=table-striped
Display name;Name;Property Type;Data Type;Rise OnReset;DefaultValue
Current date;CurrentDate;Input;Date andTime;true;Today()
Current day color;CurrentDayColor;Input;Color;false;RGBA(128, 0, 0, 1)
Event dates;EventDates;Input;Table;false;[Today(), Today()+1]
Event color;eventColor;Input;Color;false;RGBA(255, 0, 0, 1)
Header labels;HeaderLabels;Input;Table;false;["Lun", "Mar", "Mer", "Gio", "Ven","Sab", "Dom"]
Header fill;HeaderFill;Input;Color;false;RGBA(255, 119, 40, 1)
Header color;HeaderColor;Input;Color;false;RGBA(250, 250,250, 1)
Day fill;DayFill;Input;Color;false;RGBA(246, 239, 221, 1)
Day color;DayColor;Input;Color;false;RGBA(0, 0, 0, 1)
Selectedcolor;SelectedColor;Input;Color;false;RGBA(255, 119, 40, .5)
Selected date;SelectedDate;Output;Date and time;false;_selectedDate
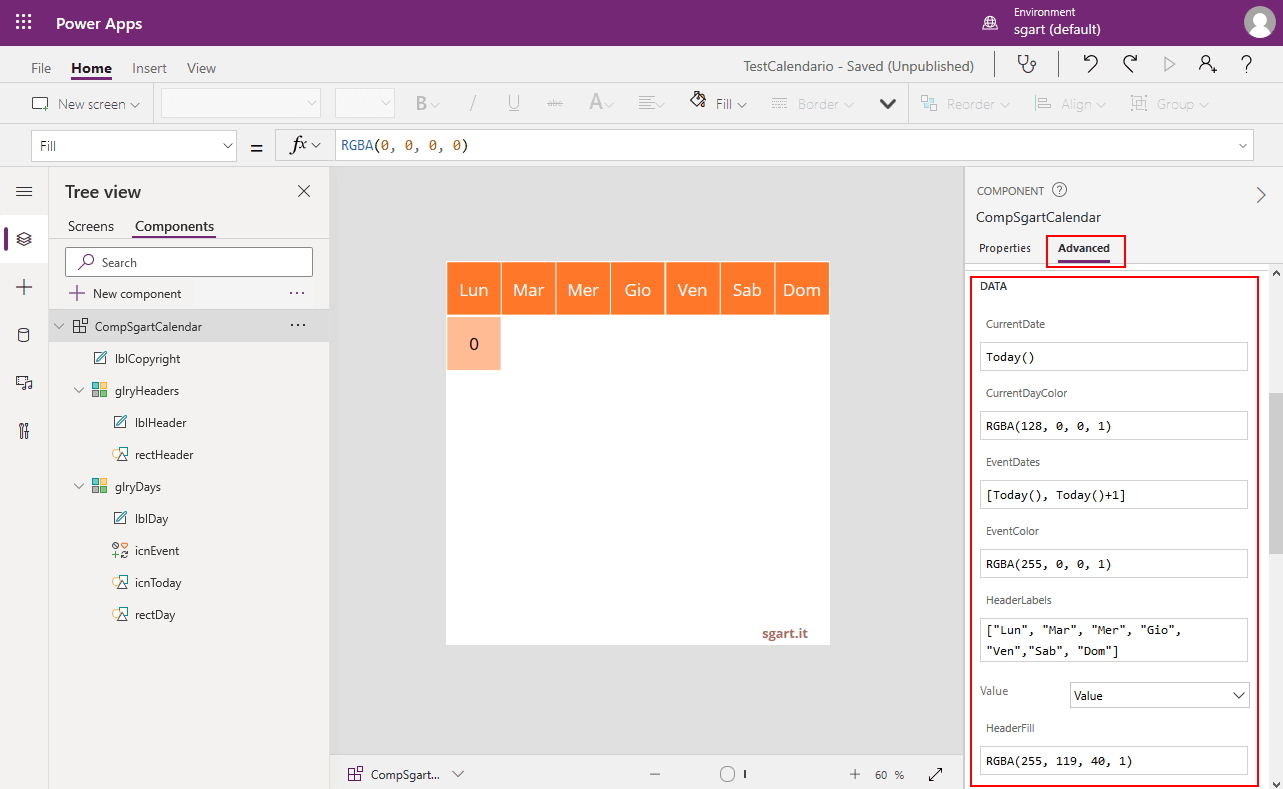
i valori di default delle proprietà possono essere impostate andando nella scheda
Advanced
Advanced default propertyLe proprietà permettono di impostare la data del mese da visualizzare, i colori dei vari elementi, oltre a poter ottenere la proprietà di uscita (SelectedDate).
Set componente
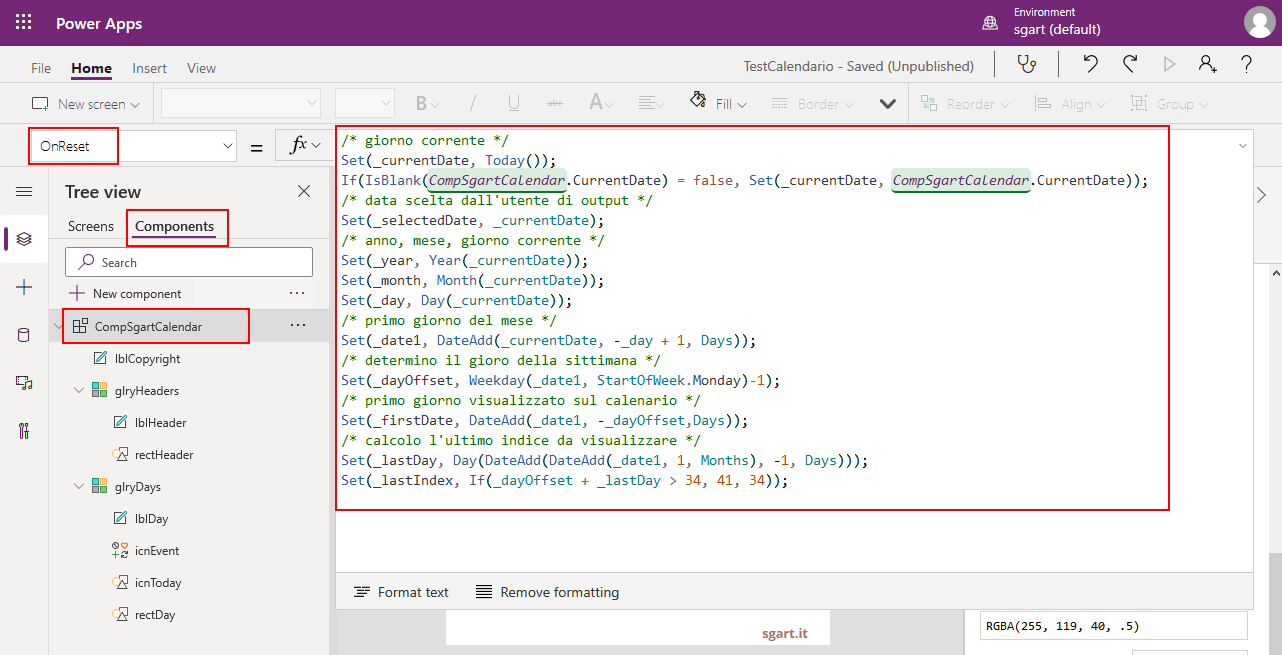
Il passo successivo è fare alcune inizializzazioni nell'evento
OnReset
OnReset/* giorno corrente */
Set(_currentDate, Today());
If(IsBlank(CompSgartCalendar.CurrentDate) = false, Set(_currentDate, CompSgartCalendar.CurrentDate));
/* data scelta dall'utente di output */
Set(_selectedDate, _currentDate);
/* anno, mese, giorno corrente */
Set(_year, Year(_currentDate));
Set(_month, Month(_currentDate));
Set(_day, Day(_currentDate));
/* primo giorno del mese */
Set(_date1, DateAdd(_currentDate, -_day + 1, Days));
/* determino il gioro della sittimana */
Set(_dayOffset, Weekday(_date1, StartOfWeek.Monday)-1);
/* primo giorno visualizzato sul calenario */
Set(_firstDate, DateAdd(_date1, -_dayOffset,Days));
/* calcolo l'ultimo indice da visualizzare */
Set(_lastDay, Day(DateAdd(DateAdd(_date1, 1, Months), -1, Days)));
Set(_lastIndex, If(_dayOffset + _lastDay > 34, 41, 34));
A questo punto si possono impostare le
proprietà dei controlli per:
- rendere il controllo responsive
- visualizzare il giorno corrente (Today)
- visualizzare un segno di spunta se la data è una di quelle passate nella proprietà EventDates
- evidenziare il giorno selezionato tramite click (valore che verrà riportato nella property di output SelectedDate)
Entrando nel dettaglio, le proprietà dei controlli andranno impostate nel modo seguente:
/* glryHeaders */
glryHeaders.BorderThickness = 0
glryHeaders.Fill = RGBA(0, 0, 0, 0)
glryHeaders.Height = Parent.Height / 7
glryHeaders.Items = CompSgartCalendar.HeaderLabels
glryHeaders.ShowScrollbar = false
glryHeaders.TemplatePadding = 2
glryHeaders.TemplateSize = Self.Height - Self.TemplatePadding * 2
glryHeaders.Width = Parent.Width
glryHeaders.WrapCount = 7
glryHeaders.X = 0
glryHeaders.Y = 0
/* glryHeaders lblHeader */
lblHeader.BorderThickness = 0
lblHeader.Color = CompSgartCalendar.HeaderColor
lblHeader.Fill = RGBA(0, 0, 0, 0)
lblHeader.FontWeight = Normal
lblHeader.Height = Parent.TemplateHeight
lblHeader.PaddingBottom = 0
lblHeader.PaddingLeft = 0
lblHeader.PaddingRight = 0
lblHeader.PaddingTop = 0
lblHeader.Text = ThisItem.Value
lblHeader.Width = Parent.TemplateWidth
lblHeader.X = 0
lblHeader.Y = 0
/* glryHeaders rectHeader */
rectHeader.BorderThickness = 0
rectHeader.Fill = CompSgartCalendar.HeaderFill
rectHeader.Height = Parent.TemplateHeight
rectHeader.Width = Parent.TemplateWidth
rectHeader.X = 0
rectHeader.Y = 0
/* glryDays */
glryDays.BorderThickness = 0
glryDays.Fill = RGBA(0, 0, 0, 0)
glryDays.Height =Parent.Height - glryHeaders.Height
glryDays.Items = [0,1,2,3,4,5,6,7,8,9,10,11,12,13,14,15,16,17,18,19,20,21,22,23,24,25,26,27,28,29,30,31,32,33,34,35,36,37,38,39,40,41]
glryDays.OnSelect = Set(_selectedDate, DateAdd(_firstDate, ThisItem.Value, Days))
glryDays.ShowScrollbar = false
glryDays.TemplatePadding = 2
glryDays.TemplateSize = Parent.Height / 7 - Self.TemplatePadding -1
glryDays.Width = Parent.Width
glryDays.WrapCount = 7
glryDays.X = 0
glryDays.Y = glryHeaders.Height
/* glryDays lblDay */
lblDay.BorderThickness = 0
lblDay.Color = If(IsNumeric(ThisItem.Value), CompSgartCalendar.DayColor, CompSgartCalendar.HeaderColor)
lblDay.Fill = If(DateAdd(_firstDate, ThisItem.Value, Days) = _selectedDate, CompSgartCalendar.SelectedColor, RGBA(0,0,0,0))
lblDay.FontWeight = Normal
lblDay.Height = Parent.TemplateHeight
lblDay.OnSelect = Select(Parent)
lblDay.PaddingBottom = 0
lblDay.PaddingLeft = 0
lblDay.PaddingRight = 0
lblDay.PaddingTop = 0
lblDay.Size = 21
lblDay.Text = Day(DateAdd(_firstDate, ThisItem.Value, Days))
lblDay.Visible =ThisItem.Value <= _lastIndex
lblDay.Width = Parent.TemplateWidth
lblDay.X = 0
lblDay.Y = 0
/* glryDays rectDay */
rectDay.BorderThickness = 0
rectDay.Fill = If(_month = Month(DateAdd(_firstDate, ThisItem.Value, Days)) ,CompSgartCalendar.DayFill, RGBA(0,0,0,0))
rectDay.Height = Parent.TemplateHeight
rectDay.Width = Parent.TemplateWidth
rectDay.X = 0
rectDay.Y = 0
/* glryDays icnEvent */
icnEvent.BorderThickness = 0
icnEvent.Color = CompSgartCalendar.EventColor
icnEvent.Fill = RGBA(0, 0, 0, 0)
icnEvent.Height = 20
icnEvent.Icon = Check
icnEvent.OnSelect = Select(Parent)
icnEvent.PaddingBottom = 0
icnEvent.PaddingLeft = 0
icnEvent.PaddingRight = 0
icnEvent.PaddingTop = 0
icnEvent.Visible = lblDay.Visible && IsBlank(LookUp(CompSgartCalendar.EventDates, ThisRecord.Value = DateAdd(_firstDate, ThisItem.Value, Days)).Value)=false
icnEvent.Width = 20
icnEvent.X = Parent.TemplateWidth - Self.Width - 5
icnEvent.Y = Parent.TemplateHeight - Self.Height - 5
/* glryDays icnToday (Right triangle) */
icnToday.BorderThickness = 0
icnToday.Fill = CompSgartCalendar.CurrentDayColor
icnToday.Height = 25
icnToday.OnSelect = Select(Parent)
icnToday.PaddingBottom = 0
icnToday.PaddingLeft = 0
icnToday.PaddingRight = 0
icnToday.PaddingTop = 0
icnToday.Visible = lblDay.Visible && DateAdd(_firstDate, ThisItem.Value, Days) = Today()
icnToday.Width = 25
icnToday.X = 0
icnToday.Y = Parent.TemplateHeight - Self.Height
/* lblCopyright */
lblDay.BorderThickness = 0
lblDay.Color = RGBA(127, 0, 0, .6)
lblDay.Fill = RGBA(0, 0, 0, 0)
lblDay.FontWeight = FontWeight.Bold
lblDay.Height = 40
lblDay.Size = 16
lblDay.Text = "sgart.it"
lblDay.Width = 150
lblDay.X = Parent.Width - Self.Width
lblDay.Y = Parent.Height - Self.Height
In particolare la gallery
glryDays dovrà avere la proprietà
Items impostata con una collection fissa che copra il numero di giorni visualizzabili:
[0,1,2,3,4,5,6,7,8,9,10,11,12,13,14,15,16,17,18,19,20,21,22,23,24,25,26,27,28,29,30,31,32,33,34,35,36,37,38,39,40,41].
Sia
glryHeader che
glryDays dovranno avere la proprietà
WrapCount uguale a
7 per fare in modo che le colonne si ripetano orizzontalmente.
La proprietà
Text della label
lblDay dovrà visualizzare il giorno corretto:
Day(DateAdd(_firstDate, ThisItem.Value, Days)).
Il background del rettangolo
rectDay, proprietà
Fill, evidenzierà se il giorno fa parte o meno del mese selezionato:
If(_month = Month(DateAdd(_firstDate, ThisItem.Value, Days)) ,CompSgartCalendar.DayFill, RGBA(0,0,0,0))Screen
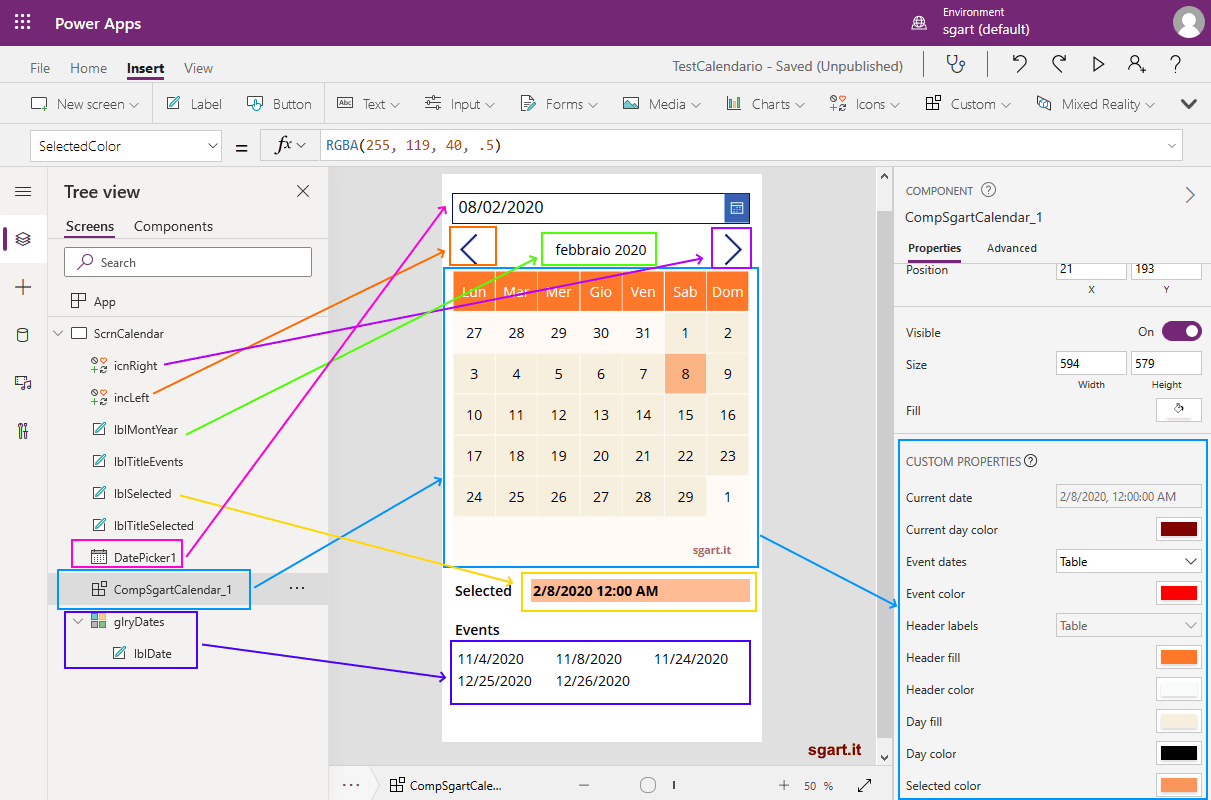
Una volta realizzato il componente può essere aggiunto alla pagina (screen):
componente in paginaNell'esempio i controlli hanno questa struttura:
- ScrnCalendar
- icnright
- icnLeft
- lblMontYear
- lblTitleEvents
- lblSelected
- lblTitleSelected
- DatePicker1
- CompSgartCalendar_1 (il componente appena realizzato)
- glryDates
- lblDate
- lblDay
- icnEvent
- icnToday
- rectDay
dove le proprietà principali vanno impostate in questo modo:
/* App */
App.OnStart = ClearCollect(TableDates, [Today(), Date(2020,11,4), Date(2020,11,24), Date(2020,12,25), Date(2020,12,26)]); Set(_currentDate, Today());
/* DatePicker1 */
DatePicker1 .DefaultDate = _currentDate
/* CompSgartCalendar_1 */
CompSgartCalendar_1.CurrentDate = DatePicker1.SelectedDate
CompSgartCalendar_1.CurrentDayColor = RGBA(128, 0, 0, 1)
CompSgartCalendar_1.DayColor = RGBA(0, 0, 0, 1)
CompSgartCalendar_1.DayFill = RGBA(246, 239, 221, 1)
CompSgartCalendar_1.EventColor = RGBA(255, 0, 0, 1)
CompSgartCalendar_1.EventDates= TableDates
CompSgartCalendar_1.Fill = RGBA(253, 222, 207, .1)
CompSgartCalendar_1.HeaderColor = RGBA(250, 250,250, 1)
CompSgartCalendar_1.HeaderFill = RGBA(255, 119, 40, 1)
CompSgartCalendar_1.HeaderLabels = ["Lun", "Mar", "Mer", "Gio", "Ven","Sab", "Dom"]
CompSgartCalendar_1.SelectedColor = RGBA(255, 119, 40, .5)
/* lblSelected - visualizzo il parametro di output */
lblSelected .Text = Text(CompSgartCalendar_1.SelectedDate, DateTimeFormat.ShortDate, "it-IT")
/* icnRight - mese successivo */
icnRight.OnSelect = Set(_currentDate, DateAdd(DatePicker1.SelectedDate, 1,Months))
/* icnRight - mese precedente */
icnRight.OnSelect = Set(_currentDate, DateAdd(DatePicker1.SelectedDate, -1,Months))
/* glryDates */
glryDates.Items = SortByColumns(TableDates, "Value")
lblDate.Text = ThisItem.Value
La collection TableDates contiene le date degli eventi da visualizzare sul calendario. La label lblSelected visualizza il parametro di output del calendario SelectedDate.
Realizzare questo controllo è un buon esercizio didattico che aiuta a prendere familiarità con il mondo
Power Apps e i componenti.
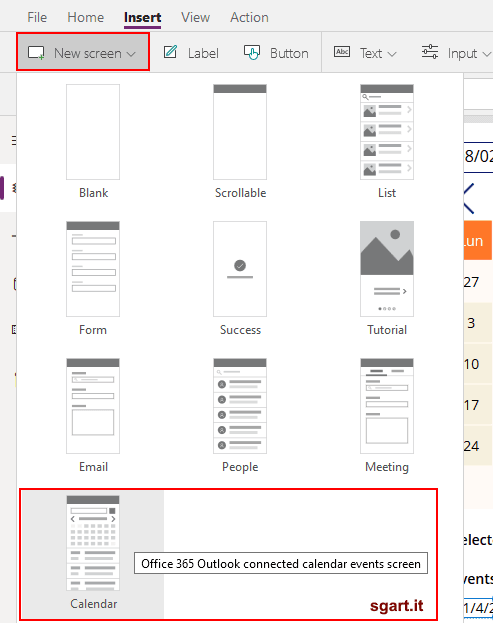
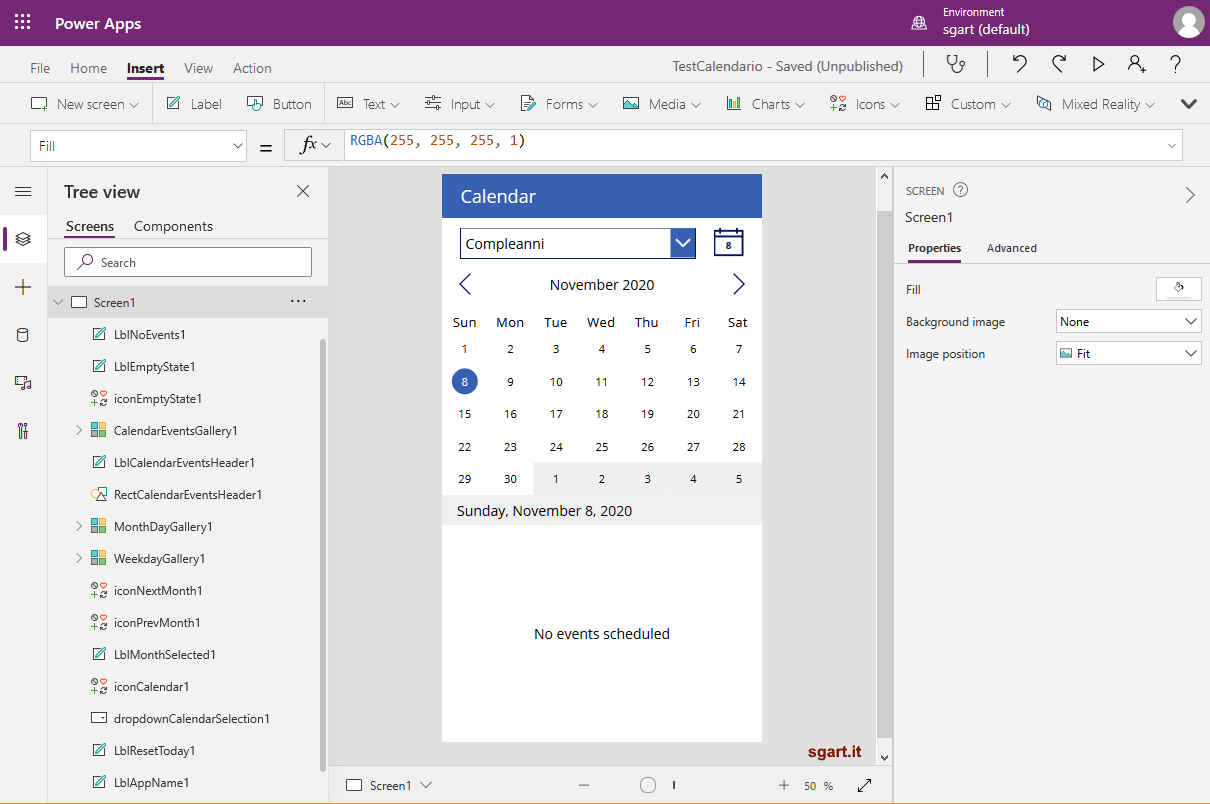
Alternativa
Come dicevo all'inizio, non esiste un controllo calendario nativo, ma esiste un
template di schermo di tipo calendario.
Template screen calendarQuesto template aggiunge un calendario con tutti i controlli di navigazione e un
data source collegato al calendario dell'utente:
Screen con calendarpuò essere un ottima base di partenza per eventuali personalizzazioni, come ad esempio cambiare il data source e farlo puntare a un data source diverso.